ChemML Wrapper Tutorial
…::: ChemML Wrapper is currently only available in the version 0.4.* (Python 2.7) :::…
ChemML Wrapper carry out a workflow of operations hosted by different open-source or commercial libraries/software. The workflow is similar to a directed graph and it can be designed in a text file. An input file (configuration file) is required to run the ChemML Wrapper.
In this section we walk you through all the required steps to run an input file.
Step #1: prepare an input file
ChemML Wrapper requires an input file to configure and run an arbitrary workflow. This file must be a text file in any arbitrary format. If you want to create or modify an input file manually, see Input File Manual for more information. You can also create, modify, and even visualize an input file using the graphical interface, Input File GUI.
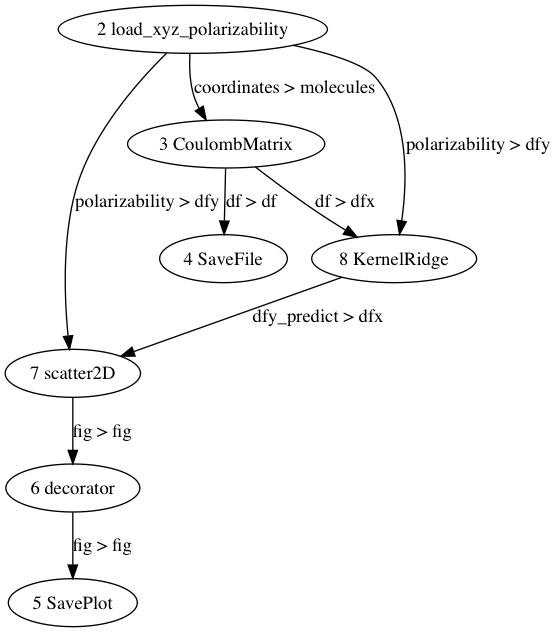
The input file consists of methods that are connected to each other and make a data mining workflow. Here you can see a simple input script:
## (Enter,datasets)
    << host = chemml
    << function = load_xyz_polarizability
    >> coordinates 0
    >> polarizability 4
    >> polarizability 5

## (Represent,molecular descriptors)
    << host = chemml
    << function = CoulombMatrix
    >> 0 molecules
    >> df 1
    >> df 6

## (Store,file)
    << host = chemml
    << function = SaveFile
    << filename = CM_features
    >> 1 df

## (Store,figure)
    << host = chemml
    << function = SavePlot
    << kwargs = {'normed':True, 'bbox_inches':'tight'}
    << output_directory = plots
    << filename = performance
    >> 2 fig

## (Visualize,artist)
    << host = chemml
    << function = decorator
    << title = training performance
    << grid_color = g
    << xlabel = predicted polarizability (Bohr^3)
    << ylabel = calculated polarizability (Bohr^3)
    << grid = True
    << size = 12
    >> fig 2
    >> 3 fig

## (Visualize,plot)
    << host = chemml
    << function = scatter2D
    << y = 0
    << marker = o
    << x = 0
    >> fig 3
    >> 4 dfy
    >> 7 dfx

## (Model,regression)
    << host = sklearn
    << function = KernelRidge
    << func_method = fit
    << kernel = rbf
    >> 5 dfy
    >> 6 dfx
    >> dfy_predict 7
Let’s create a text file with name ‘tutorial.config’ and copy the above input script into that file. If we copy this script into ‘existing script’ tab of the Input File GUI, a graphical visualization of the workflow will be presented as follow:
Step #2: run ChemML Wrapper
Now that we have prepared an input script/file, we can run it using any of the following ways.
method one: Running in the Terminal
Let’s say you saved your script with the name ‘tutorial.config’ in your Desktop folder (name and format are both arbitrary). In the Terminal, navigate to the Desktop folder and enter the following command:
chemmlwrapper -i tutorial.config -o output_directory
method two: Running in any Python Interpreter
You can also run your input script with python codes as a python script or interactively, using:
# we assume you saved your script with the name 'tutorial.config' in your Desktop folder
from cheml import wrapperRUN
wrapperRUN(INPUT_FILE = '/Desktop/tutorial.config', OUTPUT_DIRECTORY = 'output_directory')

# or

script = """
            ## (Enter,datasets)
                << host = chemml
                << function = load_xyz_polarizability
                >> coordinates 0
                >> polarizability 4
                >> polarizability 5

            ## (Represent,molecular descriptors)
                << host = chemml
                << function = CoulombMatrix
                >> 0 molecules
                >> df 1
                >> df 6

            ## (Store,file)
                << host = chemml
                << function = SaveFile
                << filename = CM_features
                >> 1 df

            ## (Store,figure)
                << host = chemml
                << function = SavePlot
                << kwargs = {'normed':True, 'bbox_inches':'tight'}
                << output_directory = plots
                << filename = performance
                >> 2 fig

            ## (Visualize,artist)
                << host = chemml
                << function = decorator
                << title = training performance
                << grid_color = g
                << xlabel = predicted polarizability (Bohr^3)
                << ylabel = calculated polarizability (Bohr^3)
                << grid = True
                << size = 12
                >> fig 2
                >> 3 fig

            ## (Visualize,plot)
                << host = chemml
                << function = scatter2D
                << y = 0
                << marker = o
                << x = 0
                >> fig 3
                >> 4 dfy
                >> 7 dfx

            ## (Model,regression)
                << host = sklearn
                << function = KernelRidge
                << func_method = fit
                << kernel = rbf
                >> 5 dfy
                >> 6 dfx
                >> dfy_predict 7

         """
wrapperRUN(INPUT_FILE = script, OUTPUT_DIRECTORY = 'output_directory')
Although you can run your script interactively, we recommend using the first method along with ‘nohup’ command to prevent Terminal disconnection from killing your job.
Note
in all these methods if your arbitrary name of ouput_directory already exists, chemML Wrapper automatically creates a folder with sequential number.
Step #3: check the output directory
After running ChemML Wrapper you can collect all your saved files by navigating to the output directory. These saved files can be any type of results and fugures from your workflow, or default files, e.g. error file, log file, a copy of input file, and citation file.